|
|
|
Purchase
Orders
Confirm PO Line Items
After selecting a PO to confirm, the next step is
confirming line items.
To Confirm a
Purchase Order Line Item:
1. After selecting a PO to confirm, the system will navigate to the following
page (detailed instructions under image below):

Instructions
|
| 1 |
General PO details display at the top. Requested = Requested
Delivery Date into the DC |
| 2 |
Grid displays all line items on the Purchase Order.
- Status = New (not reviewed), Committed (confirmed), Cancel, or Negotiate
(change requested by vendor)
- Item # = Albertsons Item Number
- V. Item # = Vendor Item Number
- Earliest = Earliest Ship Date (booking must be placed two weeks prior to this
date)
- Latest = Latest acceptable Ship Date
- Cases = Number of Cases Ordered
- Pieces = Number of Pieces Ordered
- FOB = Vendor's first FOB cost per case
- ExFOB = Extended FOB (FOB/Case * Cases Ordered)
- ExWeight = Extended Weight (Weight/Case * Cases Ordered)
- ExCube = Extended Carton Cube (Cubic Foot/Case * Cases Ordered)
- Descripton = Item Description
- CR columns indicate "Change Request"
data visible against the original data.
- The bottom of the data grid displays the calculated totals for the columns.
|
| 3 |
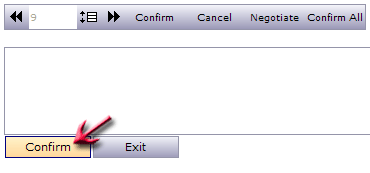
Report controls. Here is where you can navigate if there is more than one page
of data. Here you also make a selection to:
a. "Confirm" a line item. The selected line item will change to a status of
"committed".
Note:
No changes may be requested after confirming a line item.

b. "Cancel" a line item. The selected line item will be canceled, and cannot be
reinstated.

c. "Negotiate" a line item (instructions below).

Clicking negotiate will open a screen which allows you to request a ship date
or quantity change on a PO.
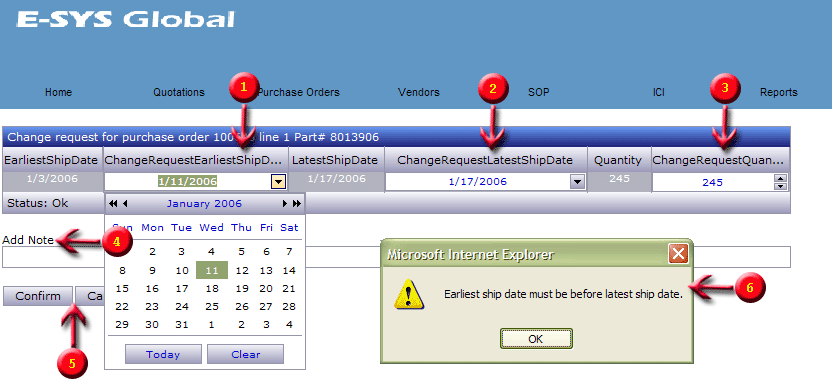
Negotiate a PO - Instructions
Note: Only items with a status of "new" can be negotiated. None of
these steps will change the PO. A change request will be sent to the Category
Manager to review and approve.
|
| 1 |
Change Earliest Ship Date by selecting desired date from the
calendar |
| 2 |
Change Latest Ship Date by selecting desired date from the calendar |
| 3 |
Change Quantity of Cases Ordered |
| 4 |
Add Note - Insert comments indicating the reason for the change request |
| 5 |
Confirm or Cancel: Confirm changes line item status to "negotiate" and Cancel
will return the page to the line item confirmation. The status will remain
"New" |
| 6 |
If the ESD change is earlier than the saved LSD, you will see this error
message |
d. "Confirm all" will Confirm all line items on the PO, and all items with
current status = "new" will be marked "committed".

|
| 4 |
After all line items on a PO are confirmed or canceled, the "Confirm" button
will activate, and you can proceed with final confirmation of the PO.
Note: POs are NOT processed by ICI until the Final
Confirmation of the order is complete.
|
|
|
 ®
®